This blog entry is part one of a series on using Julia with Google Compute Engine. It was inspired by a bit of narcissism, a burning passion for scientific computing, and lackluster experiences with other comparable languages. I recently had the opportunity to answer a question about running Julia on Google Compute Engine (GCE), and thought I’d dust off this half-finished blog entry to round it all out.
In this entry, we’ll focus on installing Julia on a GCE instance.
What is Julia?
Julia is a fairly recent programming language that focuses on high performance and ease of use. It’s become rather popular in scientific circles as an alternative to languages like R or MATLAB. It’s interactive environment means that you can explore data and models easily, but because Julia programs execute quickly, they scale well, and can be easily parallelized.
I can’t do the Julia language justice in one paragraph, so you should check out all the various features on their site. We’ll proceed to getting started.
Spinning up an instance
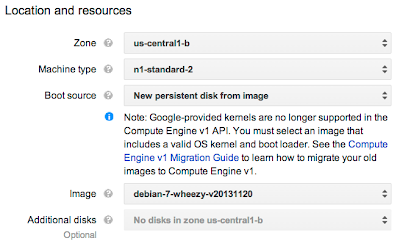
I’m going to use a two-core standard instance for my testing, running Debian, with primarily default settings. However, I want to make sure that I have access to my Google Cloud Storage bucket(s) for the next couple of blog entries, so I’ll need to tell GCE to configure the instance with those scopes with the service account (you won’t use this yet).
Caveat: this blog is a snapshot of a point in time. Images and command line instructions may become out of date. Please refer to the documentation for current examples.
Using the Developers Console
The Google Developers Console walks you through configuring your machine. There are three primary sections that you’re going to want to modify as illustrated:
Instance name
Location and resources
Project access
Using the command line
While you can do this using the Developers Console, I prefer to use the command line utility, gcutil. After installing and configuring it with your project, you can create the instance described above with a simple command:
gcutil --project="<project name>" addinstance "<instance name>" --zone="us-central1-b" --machine_type="n1-standard-2" --service_account_scopes="https://www.googleapis.com/auth/userinfo.email,https://www.googleapis.com/auth/compute,https://www.googleapis.com/auth/devstorage.read_write" --image="https://www.googleapis.com/compute/v1/projects/debian-cloud/global/images/debian-7-wheezy-v20131120"
I’ve created two instances this way, named julia-pkg and julia-src.
Installing Julia on GCE, via package manager
If you’re looking to quickly get going with Julia, it’s pretty straightforward. There’s a Julia package that provides all you need, including dependencies, JIT compiler, etc… However, it is in the unstable branch, so you’ll need to do something sort of special.
First, edit your /etc/apt/sources.list file, and add the following line (note, you’ll have to run as root):
deb http://ftp.de.debian.org/debian sid main
Now, make sure you’re pulling from the unstable branch:
$ sudo apt-get update
Next, while this is not required, you may want to create a preferences file so that you only take what you need from the unstable branch. Here how I created and populated my preferences file:
$ echo 'Package: *
Pin: release a=stable
Pin-Priority: 990

Package: *
Pin: release a=testing
Pin-Priority: 600

Package: *
Pin: release a=unstable
Pin-Priority: 300' | sudo tee /etc/apt/preferences
Instead of your regular apt-get syntax, you need to tell the package manager that you want to use is in the unstable branch:
$ sudo apt-get -t unstable install julia
Follow the prompts, and you’ll be ready to use Julia.
Installing Julia on GCE, via compiling source
So you want to be on the bleeding edge of Julia, eh? That’s cool. Julia uses quite a few other bits of software, so let’s go ahead and install them before we get started:
$ sudo apt-get install bzip2 g++ gcc gfortran git m4 make ncurses-dev
Extra credit if you go and research what you’re installing first.
Next, you’ll want to clone into the GitHub repository:
$ git clone git://github.com/JuliaLang/julia.git
Great! Now you’re ready to compile. First, step into the directory. Then, run the makefile. Because GCE CPUs use a Xeon architecture the, you’ll need to add a couple of flags that help out OpenBLAS:
$ cd julia
$ make OPENBLAS_USE_THREAD=0 OPENBLAS_TARGET_ARCH=NEHALEM
This might take some time. Go get some coffee/tea/caffeinated substance of your choice. Once the tests all pass, you’ll know that your compilation has finished successfully. You might want to create a link or alias to the executable, for ease of use.
Using Julia
Julia is an interpreted language, and as such, can be used interactively with the interpreter in addition to programs stored in files. To call up the interpreter, simply type:
$ julia # or your specified alias to ./julia
To execute a Julia program, pass the filename as an argument to the executable:
$ julia <filename.jl>
Test it out! Using your favorite editor (you may have to install it), copy and paste the following code into a file called matrix_mult.jl:
array1 = randn(8, 8)
array2 = rand(8,8)
show(*(array1, array2))
Then execute our matrix multiplication operation by running it:
$ julia matrix_mult.jl
You should see an 8x8 array described in your output, similar to this one:
That’s it for the first part of the series! Next up, we’ll make use of that service account to speed up writing your programs, distributing them, and gathering output. In the meanwhile, now would be a great time to start trying out writing small programs in Julia.


